
この記事は、cssファイルやjsファイルをサーバへアップロードするの記事の続きで、無料ホームページテンプレート.comのテンプレートをMODXで使う時の方法を書いています。
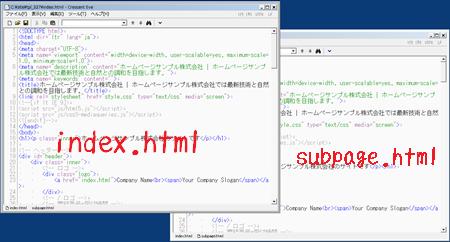
テンプレートのトップページ(index.html)とサブページ(subpage.html)のhead要素の共通の部分を編集します。
index.htmlとsubpage.htmlをテキストエディタで開いておく。
head要素の編集
<head> ~ <head>の間の編集をします。
descriptionメタタグの編集
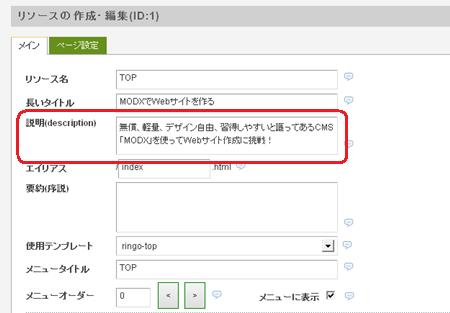
MODXの入力画面の「説明(description)」を使います。
説明(description)のリソース変数は [*description*] です。
index.html subpage.html 両方とも下のように書き換えます。
<meta name="description" content="ホームページサンプル株式会社 | ホームページサンプル株式会社では最新技術と自然との調和を目指します。">
↓
<meta name="description" content="[*description*]">
keywordsメタタグの編集
テンプレート変数の[*キーワード*]を使います。
※テンプレート変数の[*キーワード*]とテンプレートとの関連付けをする必要があります。
index.html subpage.html 両方とも下のように書き換えます。
<meta name="keywords" content="">
↓
<meta name="keywords" content="[*キーワード*]">
base要素の追加
base要素を追加します。
index.html subpage.html 両方とも追加します。
<meta name="keywords" content="[*キーワード*]">
↓
<meta name="keywords" content="[*キーワード*]">
<base href="[(site_url)]">
title要素の編集
title要素はブラウザのタブに表示される部分です。
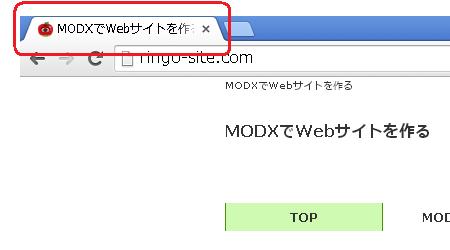
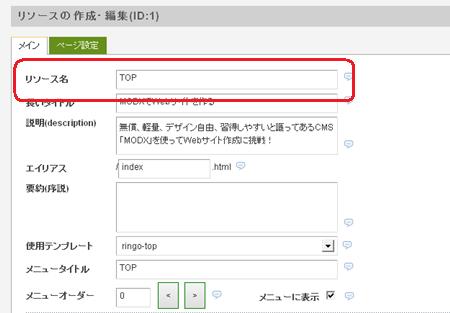
MODXの入力画面の「リソース名」と「サイト名」を使い
トップページは 『サイト名』
サブページは 『リソース名 |サイト名』
のように表示します。
リソース名のリソース変数は [*pagetitle*] です。
サイト名のリソース変数は [(site_name)] です。
index.html は下のように書き換えます。
<title>ホームページサンプル株式会社 | ホームページサンプル株式会社では最新技術と自然との調和を目指します。</title>
↓
<title>[(site_name)]</title>
subpage.html は下のように書き換えます。
<title>ホームページサンプル株式会社 | ホームページサンプル株式会社では最新技術と自然との調和を目指します。</title>
↓
<title>[*pagetitle*] | [(site_name)]</title>
link要素 stylesheetのリンク先の編集
stylesheetのリンク先をcssファイルをアップロードした場所に書き換えます。アップロード方法はこちら。
このサイトでは、 ドメイン/css/tpl_027/ に style.css をアップロードしているので、その場所を指定します。
index.html subpage.html 両方とも下のように書き換えます。
<link rel="stylesheet" href="style.css" type="text/css" media="screen">
↓
<link rel="stylesheet" href="[(base_url)]css/tpl_027/style.css" type="text/css" media="screen">
link要素 contentsの追加
contensはサイトの目次のページを示しています。
人間用サイトマップを指定します。人間用サイトマップの作り方はこちら。
index.html subpage.html 両方とも追加します。
<link rel="stylesheet" href="[(base_url)]css/tpl_027/style.css" type="text/css" media="screen">
↓
<link rel="stylesheet" href="[(base_url)]css/tpl_027/style.css" type="text/css" media="screen">
<link rel="contents" href="[(site_url)]sitemap.html" title="サイトマップ">
※sitemap.htmlの 4 はサイトマップ記事のidです
link要素 shortcut iconの追加
shortcut iconはサイトのブラウザのタブに表示されるファビコン(アイコン)です。
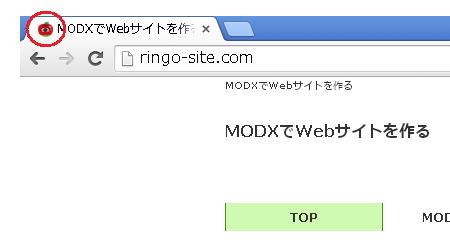
ファビコンの画像の場所を指定します。
このサイトでは、ドメイン直下に「img」というフォルダを作り、その中にファビコンの画像を置いています。
index.html subpage.html 両方とも追加します。
<link rel="contents" href="[(site_url)]sitemap.html" title="サイトマップ">
↓
<link rel="contents" href="[(site_url)]sitemap.html" title="サイトマップ">
<link rel="shortcut icon" type="image/x-icon" href="[(site_url)]img/favicon.ico">
link要素 alternateでRSSフィードを指定
alternateでRSSフィードを指定します。
RSSフィードの作り方はこちら。
index.html subpage.html 両方とも追加します。
<link rel="shortcut icon" type="image/x-icon" href="[(base_url)]img/favicon.ico">
↓
<link rel="shortcut icon" type="image/x-icon" href="[(base_url)]img/favicon.ico">
<link rel="alternate" type="application/rss+xml" title="RSSのタイトル" href="[(site_url)]rss.xml">
link要素 canonicalの追加
MODXでサイトを作ると、下記のURLは全て同じページを表示します。
http://ringo-site.com/index.php
http://ringo-site.com/index.php?id=1
何も設定しないと、検索エンジンは別のページだと認識し、中身は同じ重複コンテンツだと誤解します。
複数のURLからアクセスできるページに対してcanonicalで正規URLを定義しておくと、正規URLが正しいURLだと検索エンジンに通知することができます。
必ず設定しておきましょう!
トップページとサブページは別々に設定します。
index.html に追加します。
<link rel="alternate" type="application/rss+xml" title="RSSのタイトル" href="[(site_url)]rss.xml">
↓
<link rel="alternate" type="application/rss+xml" title="RSSのタイトル" href="[(site_url)]rss.xml">
<link rel="canonical" href="[(site_url)]">
subpage.html に追加します。
<link rel="alternate" type="application/rss+xml" title="RSSのタイトル" href="[(site_url)]rss.xml">
↓
<link rel="alternate" type="application/rss+xml" title="RSSのタイトル" href="[(site_url)]rss.xml">
<link rel="canonical" href="[(site_url)]template/free/hptemplatecom/top-sub-head.html">
外部javascriptファイルの指定
外部javascriptファイルの指定をjsファイルをアップロードした場所に書き換えます。アップロード方法はこちら。
index.html subpage.html 両方とも下のように書き換えます。
<script src="js/html5.js"></script>
<script src="js/css3-mediaqueries.js"></script>
↓
<script src="[(base_url)]js/html5.js"></script>
<script src="[(base_url)]js/css3-mediaqueries.js"></script>
head要素の編集は終わりました。
次は、テンプレートのbody要素の編集です。
この記事は、無料ホームページテンプレート.comのテンプレートを使っています